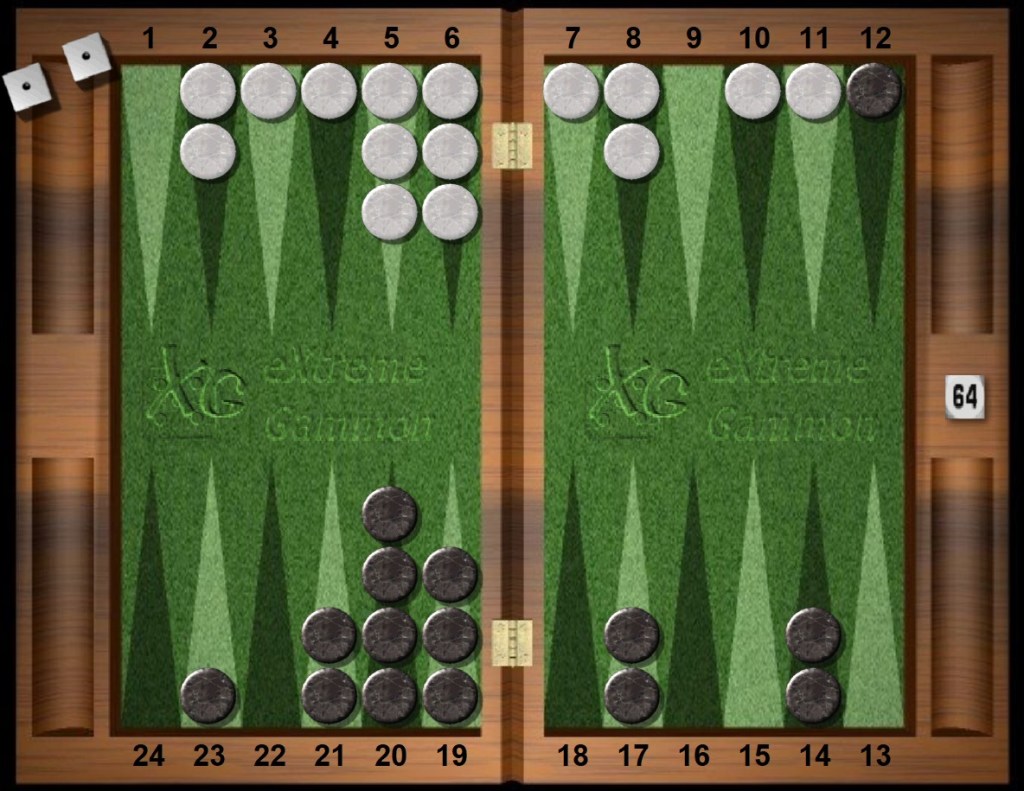
Cash game. Jacoby rule in force.
White doubles. Once White doubles, the Jacoby rule is irrelevant.
Black must decide whether to take the cube, even though Black is clearly losing this game. Or should Black pass, resign to defeat, chalk up the lost stake, and begin the next game in the session with renewed vigor.
First, Black must spend some quiet time to examine whether to Take or Pass. Don’t be pressured into a quick decision. After all, upon the white double Black is asked to escalate the stakes when Black is an underdog. White is anxious for a quick decision, but it is only fair that White wait patiently for Black’s careful analysis before agreement. White owes the courtesy of a few minutes peace.
Deep breath. Don’t hurry to do anything. Think things through when making a cube decision, especially a decision to take.
Next, check out the game plans. Big picture. How does White think she is going to win from this position? How can Black win from here? Are any gammons available? Make an estimate of gammons and single wins. Or is a bearoff race likely? Are the attacks two-edged? Or is a blockade squeezing the life out of resistance? How volatile is this situation? Who does volatility favor? How can Black win from this position enough of the time? Do some counting, either precise or vague.
A backgammon position is a reference take when a player must either reject the double and lose the stake with certainty or accept the doubled stake, and play on, yet lose the original stake on average. Both the take and the pass lose the same amount (the original stake), but the pass with certainty and the take on average.
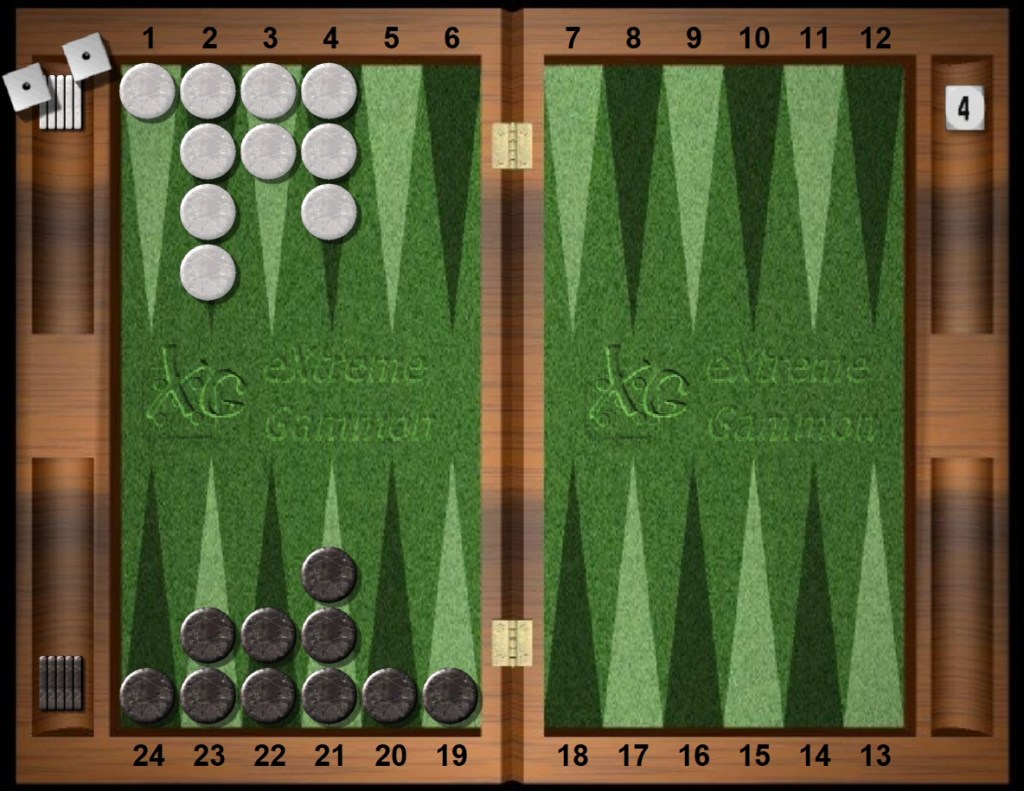
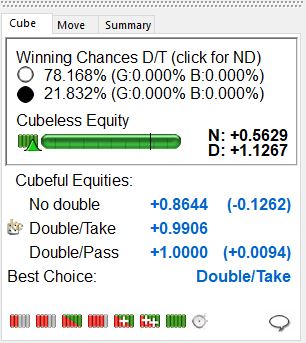
Most take decisions are not reference positions. Yet consider this position.
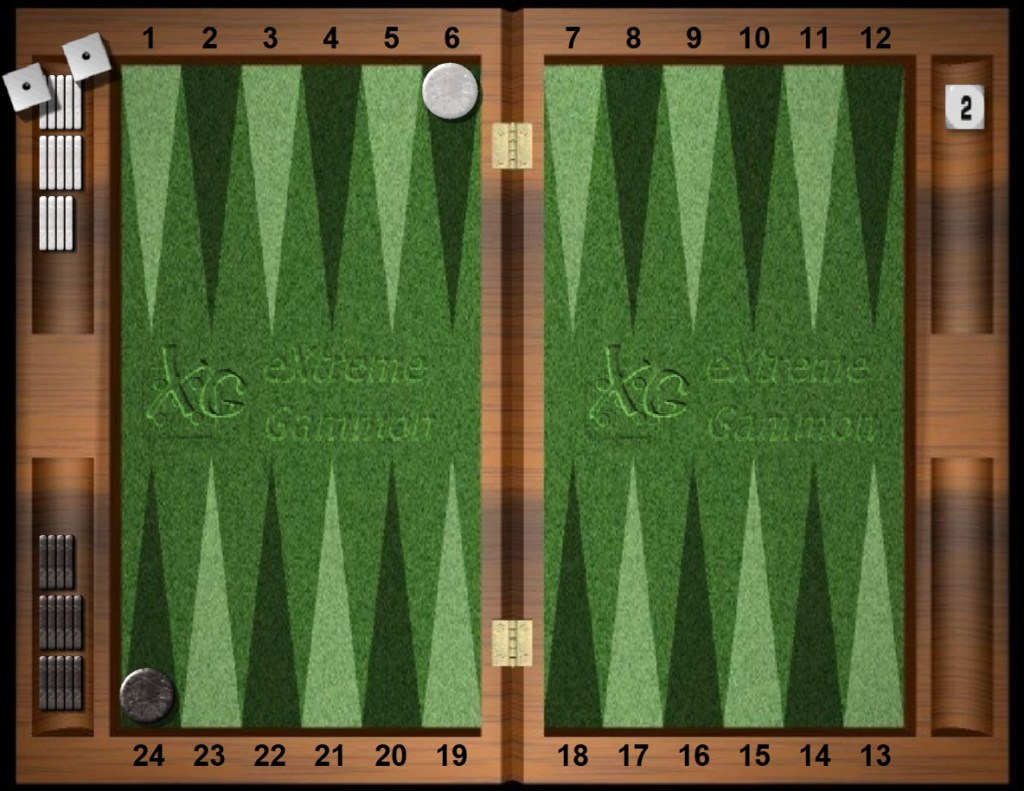
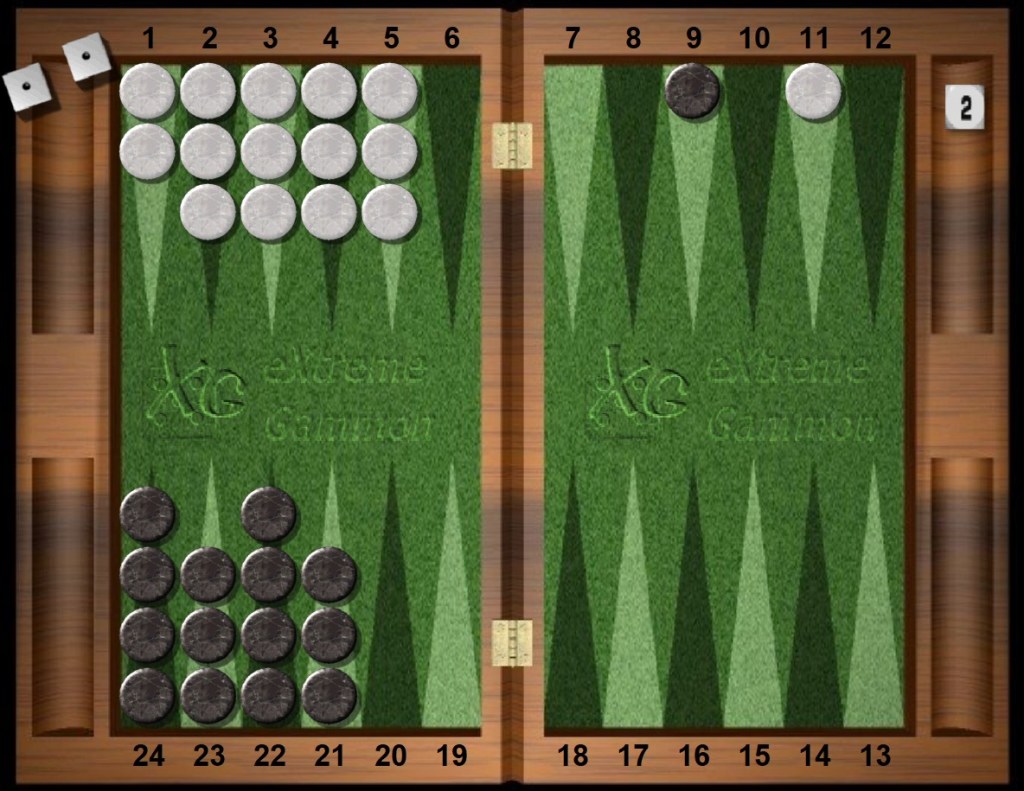
White is on the roll and owns the cube at a stake of two. White redoubles. Should Black take or pass?
In a cash game, unlike a first cube with the Jacoby rule enforced, or unlike a first cube without the Jacoby rule, or unlike deciding to turn a redouble, or unlike a play-on situation for possible gammons, the question of whether to Take or Pass a proposed double always has a specific equity as its dividing line. The player debating Pass or Take will lose one current stake whether he takes or drops. This is not the case in match play, but is the case in cash games. Hence, a study of the reference take positions in cash games is a good way to begin any improvement in the handling of the doubling cube.
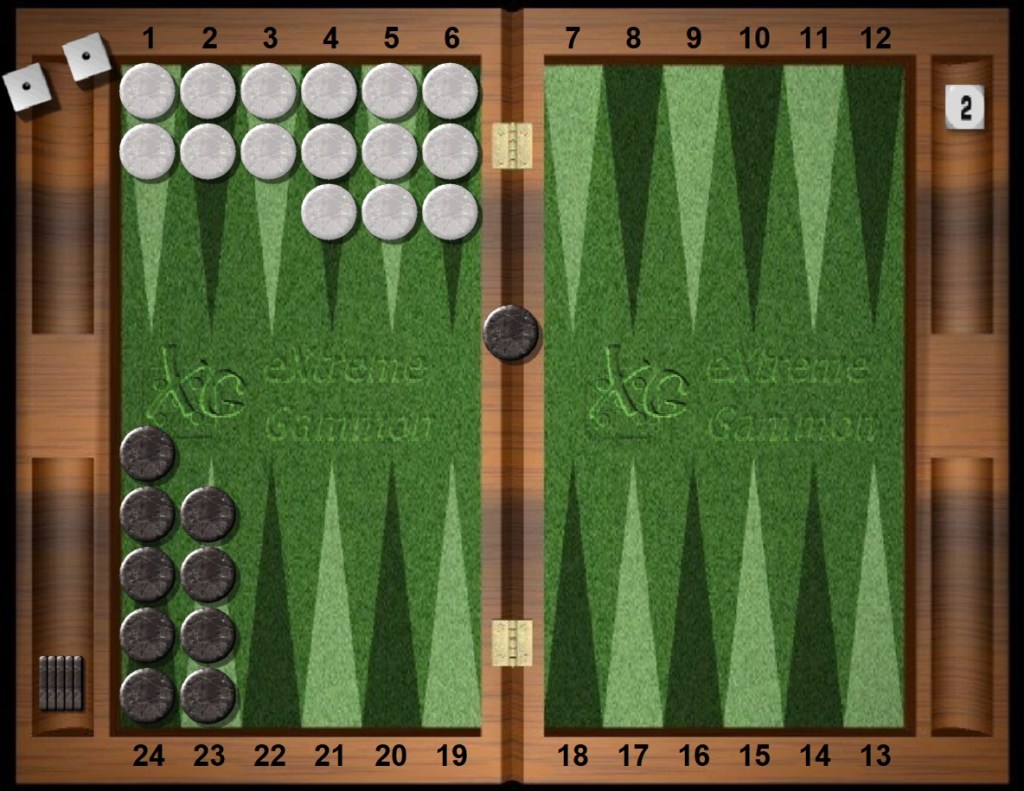
Rollouts have been performed for this position, and for all other RTP situations on this website. Yet here the probabilities and decision can be calculated exactly by listing the numbers on the dice. So let’s do that.
When does White fail to bear off? The total on the dice must be under six. The following rolls fail to bear off: 11s, 12s, 13s, 14s, 23s — a total of nine rolls that Black wins and twenty-seven rolls that White wins. The percentage wins of a single game is 75% to 25%, or 3-to-1. For amusement, ten million rollouts were performed for this position. The winning chances exactly agree with the mathematical result of the dice counting.
If you are a novice backgammon player (or good but typically don’t use the doubling cube with gusto) it may seem annoying or unfair to accept an escalation of stakes at a position in a game when you are likely to lose almost three out of every four such games. Taking doesn’t mean you are a winner; it only means that you are less of a loser. By comparison, the next cube positions are slightly less or slightly more lucrative for White.
The term “reference” which labels some Take or Pass decisions means the situation is so close that in practice it does not matter what you decide. It also doesn’t matter what numerical value the cube is currently showing. On average you will lose that stake (here, 2 points) whether you Take or Pass.
However, don’t get sloppy here. Few cube actions are precisely reference take points. Most Take decisions have a correct answer either to take or to drop. Make the wrong choice and you lose more on average than necessary. But a reference position? You can do no wrong.
Fine. What about gamesmanship? Generally I shun the idea that a good player modifies her plays in response to her opponent’s skill or emotion. It simply costs the good player money by deviating from what is known to be best. However, in a position that is a reference take point, the good player deciding on a Take or Pass suddenly has a small amount of leeway.
Gamesmanship hinges on human emotion and ignorance. Here are some possible reasons for gamesmanship: If you take and win, is there a good chance the opponent will emotionally go on tilt? Will the opponent baulk at the double next time in a similar situation? Is White the better player or is Black the better player? Will your opponent will keep her emotions under control?
In particular, the gamesmanship question becomes: Does White, as a weaker player and the current doubler, have the more complicated situation to finish this game? If White’s checkers are easy to play, Black should perhaps pass the cube, especially if the game is part of a cash game session. Time is money. Get onto the next game where your skill will pay dividends and don’t waste valuable session time finishing a reference take position where your opponent is expected to play well. This is simple time management.
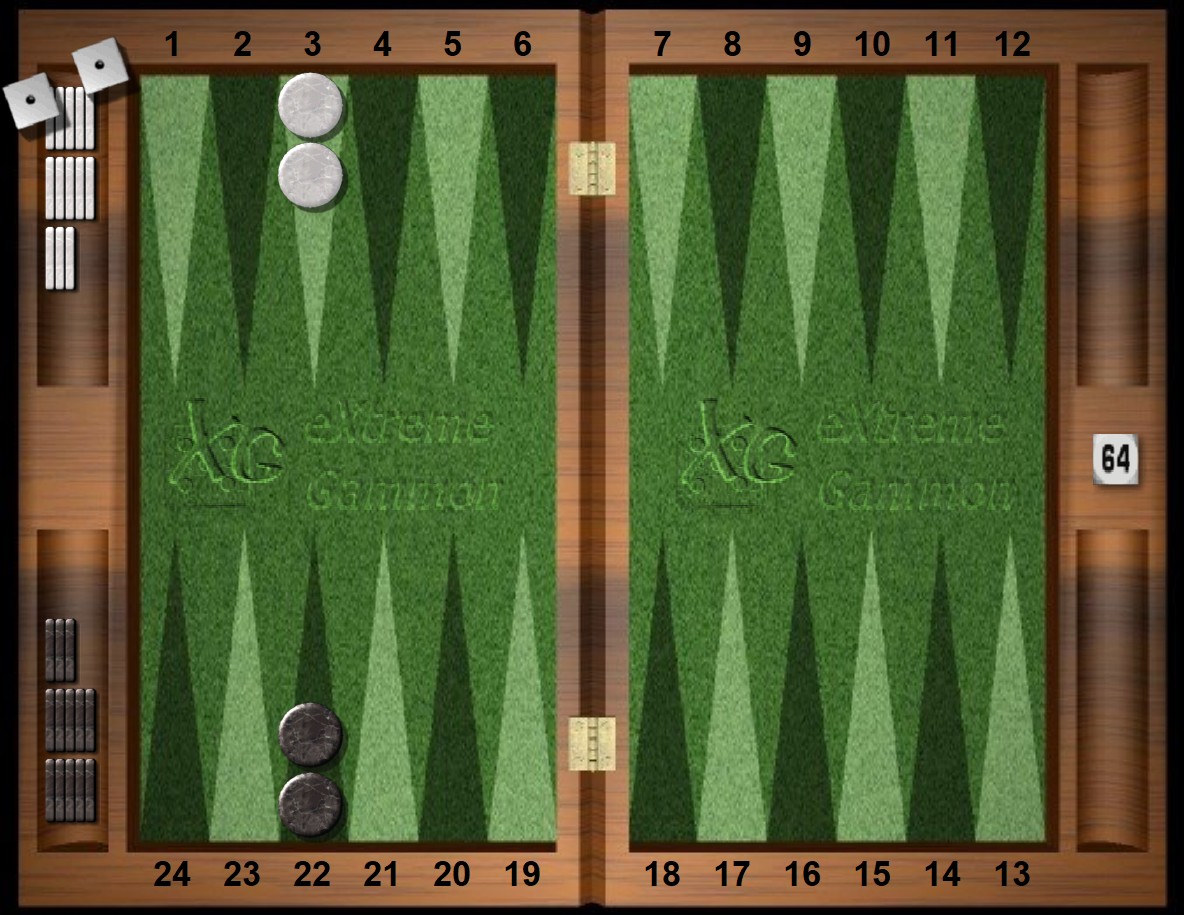
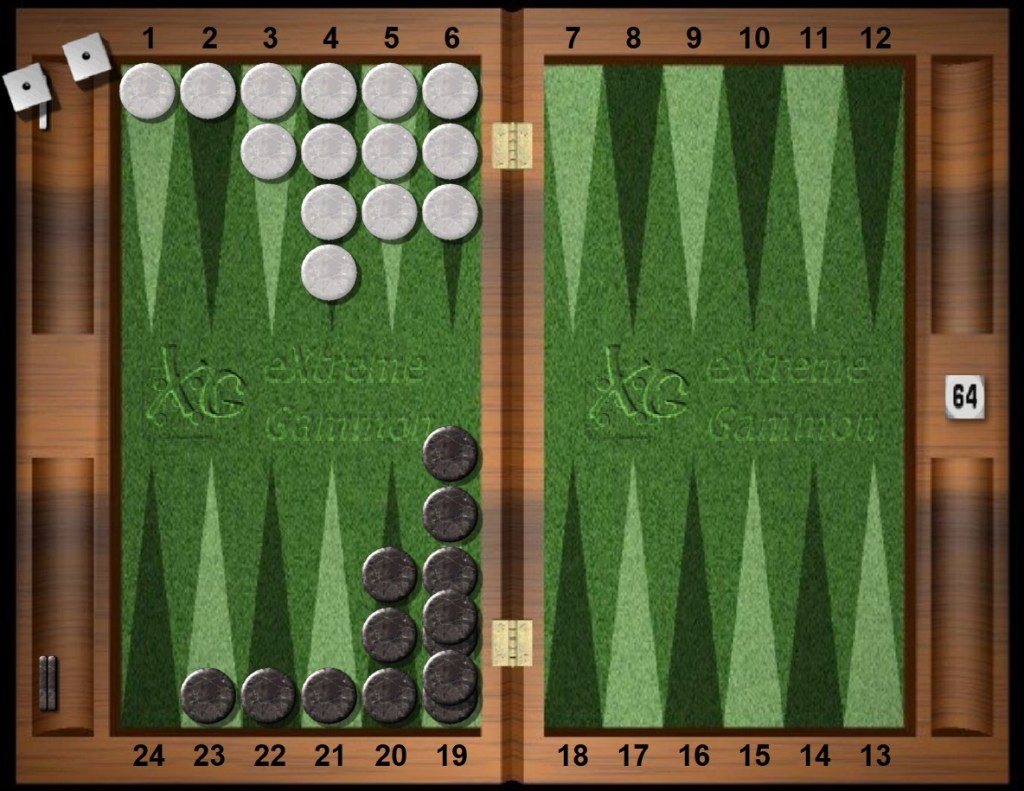
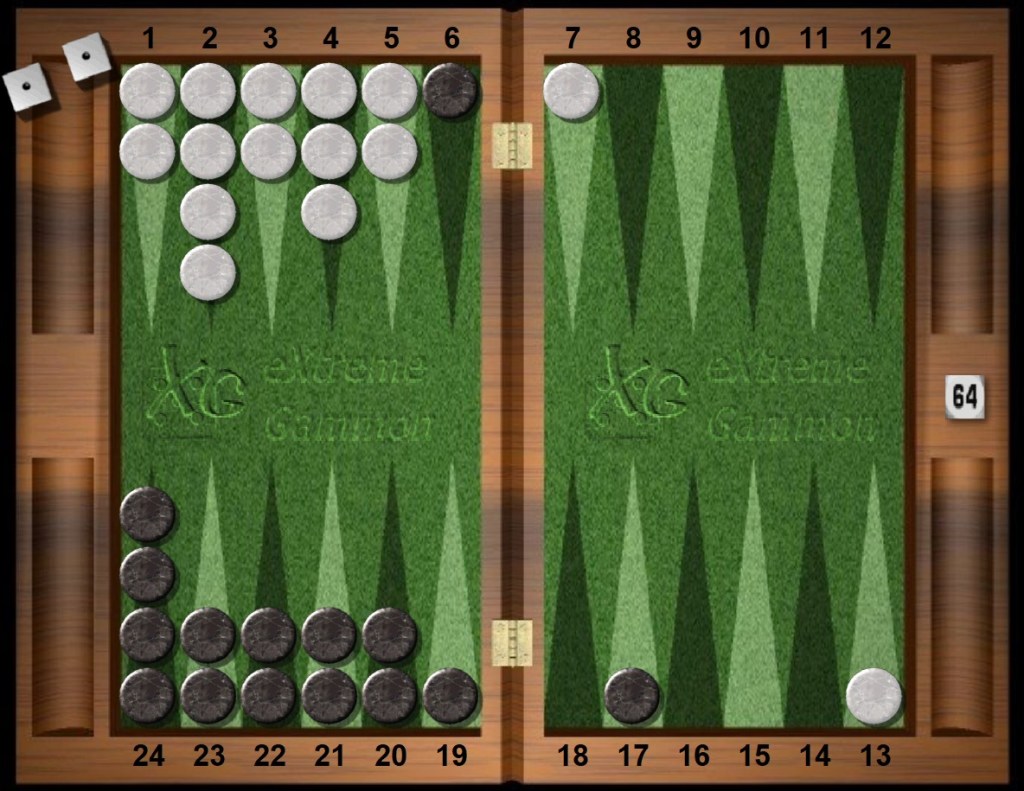
Another reference position.
All reference positions are discovered and collected from actual games. That means the relative frequencies of reference cube situations are maintained over their underlying game subtypes. If certain types of position appear more frequently, it is therefore worth the extra time to study them. Hence this position.
Later recollection found this same position published long ago by Steve Sax, a top player and a fine teacher. It is a reference position for take or pass. The position is also a good benchmark as it is easy to remember and captures some ideas simply and clearly.
Here gamesmanship suggests that if White is the weaker player, perhaps Black should pass the cube and get on with the next complicated game.
All candidates for reference status must be rolled out by the bot to confirm. Here, ten million total cases were rolled out. Black loses the game 21.935% of the time. Note agreement with the canonical 3-1 theory, modulo the 3% overshoot that often represents the value of cube ownership late in this gammon-free running game. On average Black loses two points on the scoresheet either way, passing or taking.
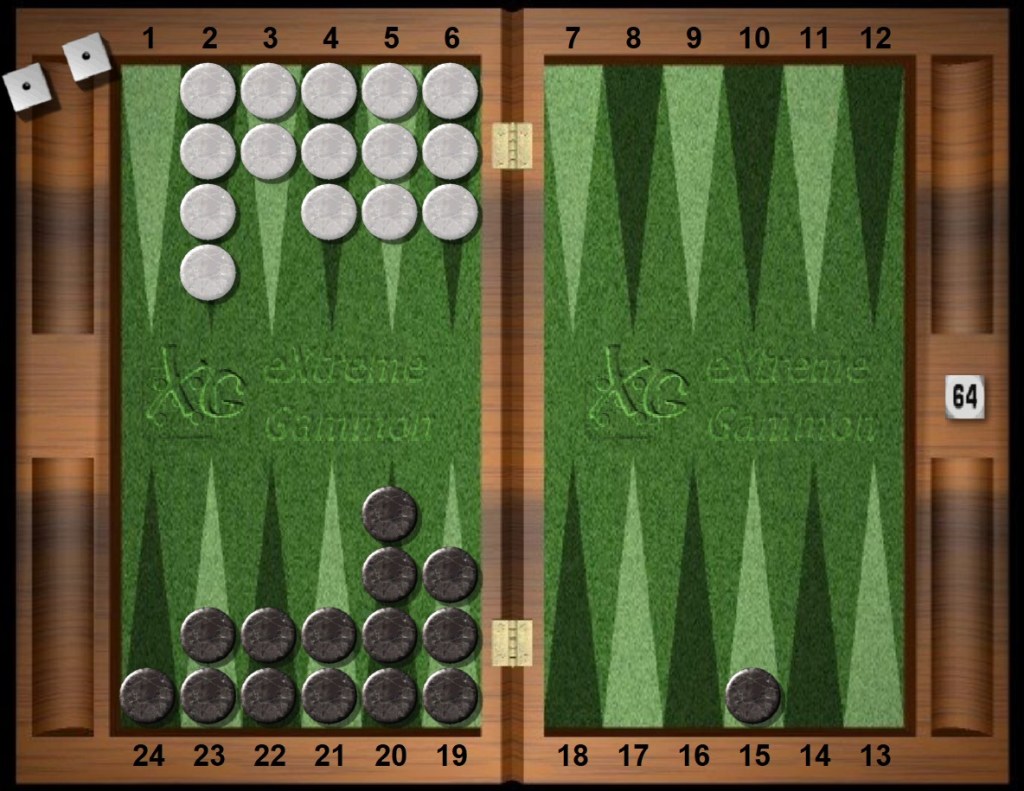
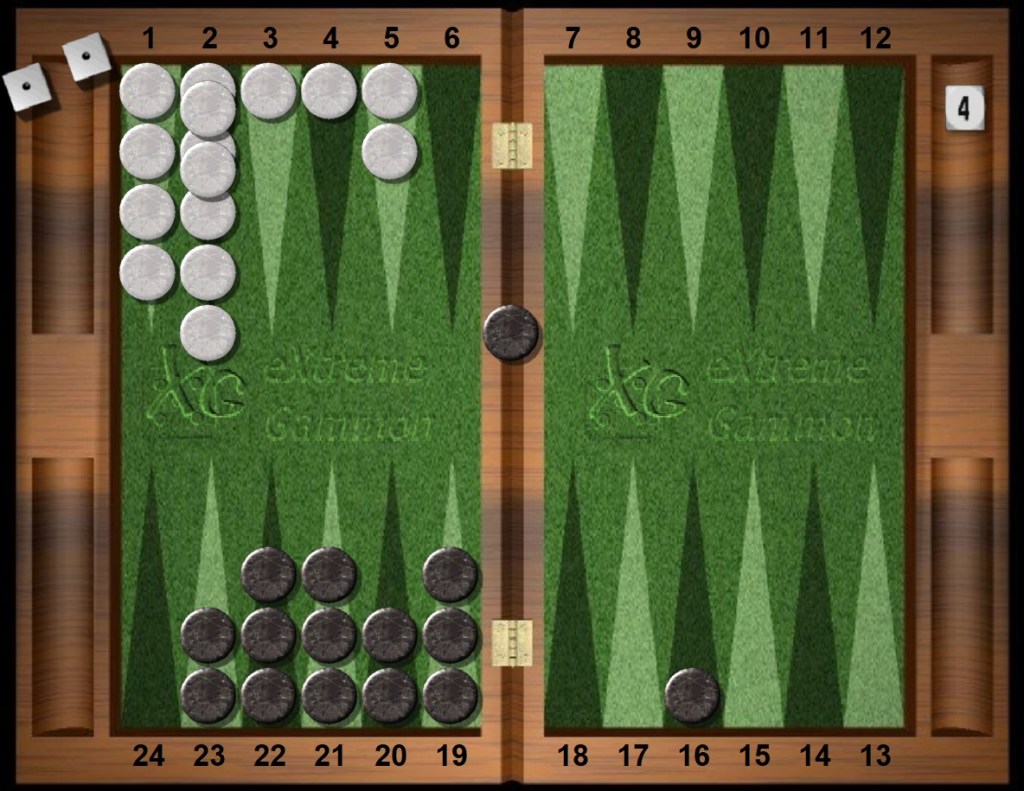
Another pair of late bearoff reference positions. Use the slider bar.
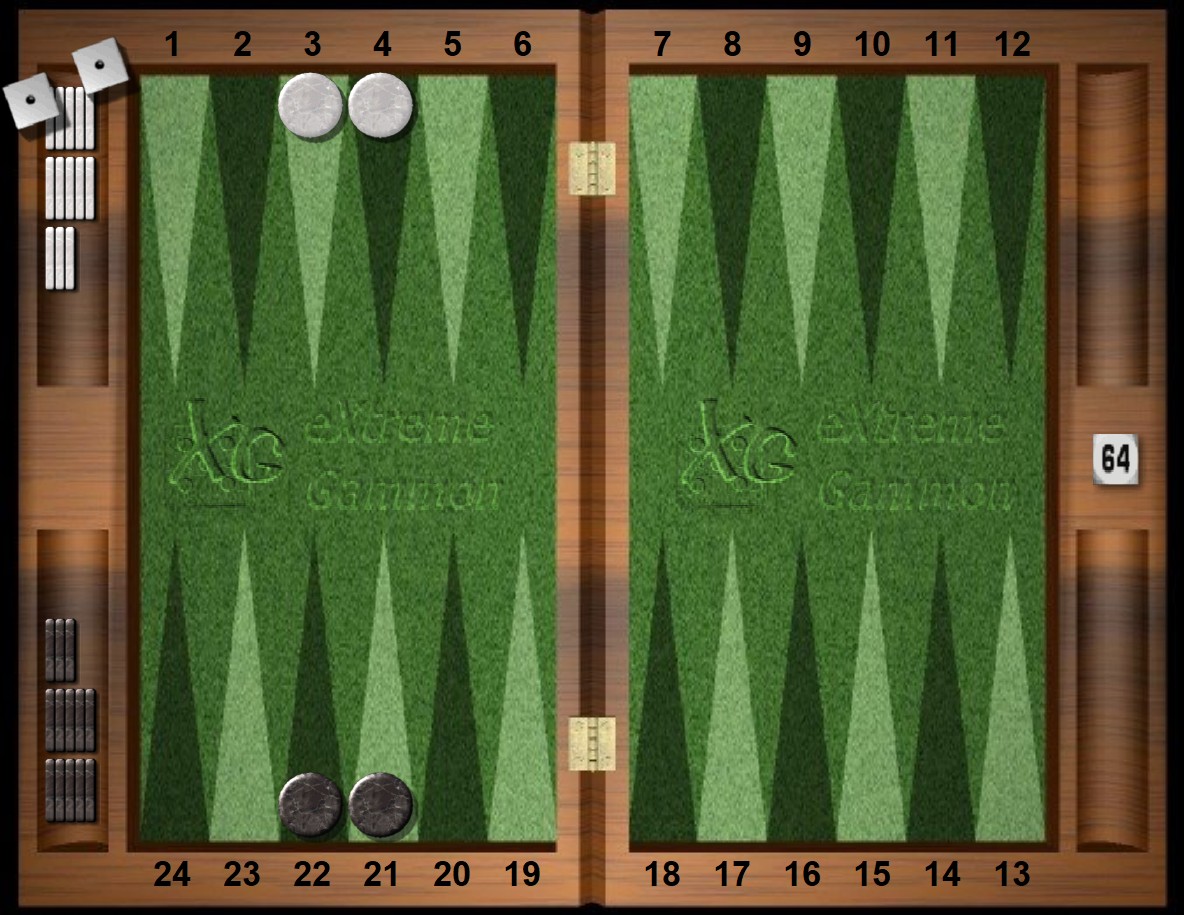
White doubles. In both reference take points #3 and #4 (RTP #3 and RTP #4) after White fails to finish the bearoff race, Black is a 17-to-19 underdog and cannot recube to gain some profit. That recube was not possible either in RTP #0 above, but for a different reason — then a guaranteed Black bearoff win.
RTP #3 is a reference take point. On average Black will lose three pennies in $10 by taking (0.003 or 3mp). RTP #4 is also a reference take point. True, on average Black will save three pennies in a $10 stake by taking, but this is a tiny difference in backgammon equity. Why can we say it is tiny? After contact is broken with White and Black in a long race towards the bearoff, a one pip difference in most positions converts to about 18 pennies in a $10 stake. That is a pretty small effect. But in this position, the mistake is six times smaller. Thus, the fuzziness of gracing a position with the epithet “reference” will always be less than two cents on the dollar, and preferably a penny on the dollar.
Gamesmanship suggests that if White, the weaker player, might become flustered and gun-shy (or rather cube-shy) and White loses a bunch, then it is worth the extra minute to take and possibly put White on tilt.
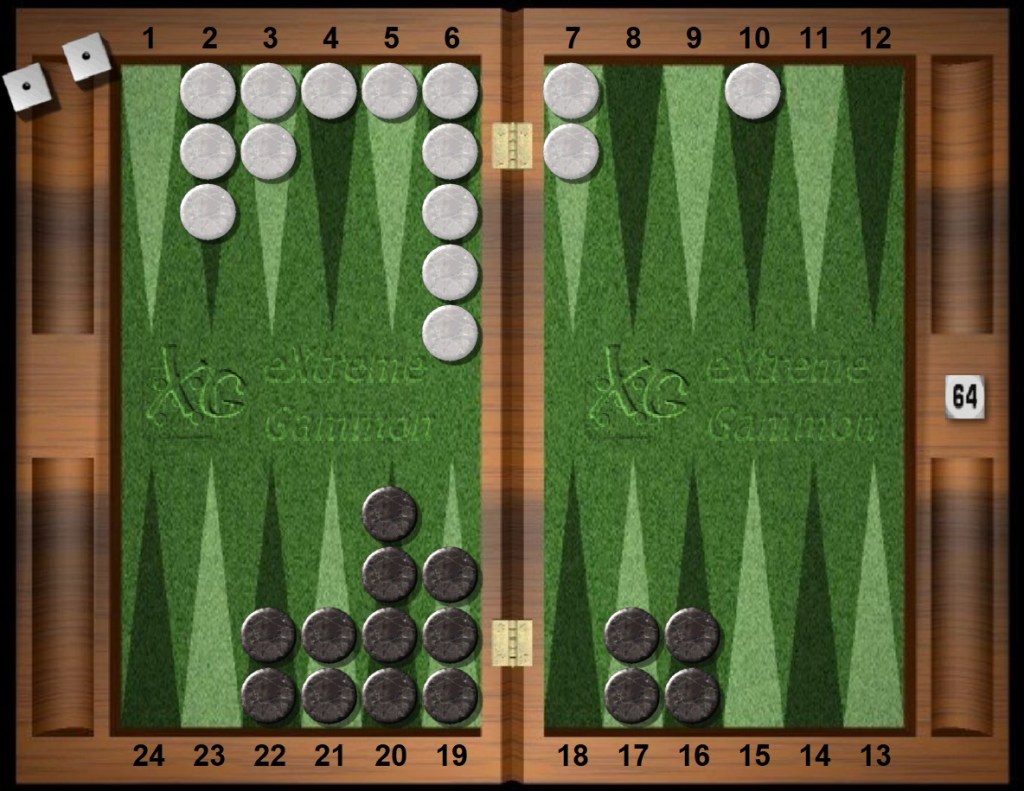
A position with three checkers each.

The theme of reference takes in a late bearoff continue with RTP #6.
In principle this position is instructive as it highlights several key ideas in a manageable way. However, there are issues and complexities. According to XG evaluator this is a razor thin take (1mp) after a first double. As such, the position represents a perfectly “efficient cube”. Yet a long rollout says it is a pass by less than 1mp — still an efficient cube. Furthermore, is it a redouble? The answer is obviously yes: there is no Jacoby paradox here. The XG investigation of Double Action is identical to Take Action, so there is no contradiction.
The next worthwhile examination is the dialog box called Dice Distribution. Right click on the standard cube analysis panel (lower left?), insist on full red-bar 4-ply, then select After Double/Take, and the various dice rolls (and combinations) are visible. The market losers are 64% and can be counted by highlighting all ML dice rolls at once (830). The volatility is a stupendous 2.090 (but only 0.552 when White fails to cube). White’s dice rolls group into five categories, but beneath are plenty of complex details. The five groups are: 33s, 44s, 55s, 66s which win the full doubled stake outright; 22s, 53s, 54s, 62s, 63s, 64s, 65s, 52s, 61s which win on average more than the original stake; 32s, 43s, 42s, 51s, 11s, 31s which win a positive but fractional amount of the stake; 21s which loses a smallish amount of the stake; and 41s which gets whacked by a recube (D/T) and loses more than the original stake. This rarity exhibits cube ownership.
But what is the true equity? Isn’t the rollout supposed to compute that? Can we carefully compute this equity value using pencil, paper, and a hand calculator? This simple-looking situation is on the hairy edge of doable with a hand calculator. Most players would baulk at the calculation over the board.
Five checkers apiece.

Again, a late bearoff position. And again no one can make a checker mistake, only the occasional recube error. Three roll bearoffs are generally a pass, but here White has issues and the take is poised on the dividing line.
Continuing the theme of late bearoff reference takes. Five checkers off versus five checkers off. Black’s distribution means less pip wastage.
Further bearoff situations. Now Black has more checkers off, currently. This position again brings the bearoff distribution into play.
Now Black still needs to bear into the home board. White is making a first double.

White owns the cube. In both RTP #11 and RTP #12, how much does cube location matter to White? Cube location matters not to Black.
A race. Both Black and White must first bearin. Crossover counts become informative.
Both Black and White need to scurry home. Crossover counts become informative. Reference take points during long races are valuable for backgammon theory as they illustrate the volatile nature of dice rolls and of overtaking a pipcount lead. Checker play is typically simplified.
The next few reference take positions are interesting races with contact and a twist of lime.
Both Black and White must run the gauntlet of jackals to break or continue contact during a race.
As the song says:
Well, I’m a danger man from a dangerous city and I lead a dangerous life. I got a dangerous car, goes dangerous speeds and a very hazardous wife. Got sixteen or seventeen dangerous girlfriends, not counting one or two. Look out, kid, you don’t want to get hit, I’m dangerous for you. You better look out.
David Bromberg
Who is more dangerous? Namely, in this volatile situation, who wins more gammons, who has more equity swings, who more mood swings?
What a difference having the roll makes.
